• You're one step from joining Guitar Discussion Forum - The Fret.
    Create a free account to post, follow threads, and never miss an update.  Sign up free →

Upcoming NGD and Beginning of Project thread - Blacktop HH Strat

Guitar Discussion Forum - The Fret

Help Support TheFret.net:

I just leave mine set to 700F (~370C) for everything. Since (1) I have had it since late 2009, (2) used it for at least 150 pedal builds plus various other guitar and lighter amp work, and (3) the two tips both look essentially the same as when they were used the first time, I guess I wouldn't worry too much about tip damage at that kind of heat setting. Of course, with a different iron, "YMMV"....but not by that much, I'd suspect.

OK, I have no idea how to translate the wattage into temp but maybe the instructions on the BYOC will say, as I bet machines differ. If you know of a general guide to translating what wattage setting, say 35W or 40W equals 700F or whatever, please point this soldering noob in the right direction. Thanks for all your insights! :D
 
OK, I have no idea how to translate the wattage into temp but maybe the instructions on the BYOC will say, as I bet machines differ. If you know of a general guide to translating what wattage setting, say 35W or 40W equals 700F or whatever, please point this soldering noob in the right direction. Thanks for all your insights! :D
Some soldering stations (like my Hakko) have a controller that is marked in degrees C or F--can't tell from the photo on the BYOC site if the station they sell is one of these or not. I'll see if I can get more info from them...
 
So the new solder station seems really nice. I like the tip size, which is like a finishing nail but more tapered. And the temp control works well. They give you temp ranges in celsius for the markings.

Yeah, ok. It all seemed good as I tried to finish the project. Having the right size screws for the pickups is really nice. But in bench testing it for connectivity, in the middle position, I am missing the inner coil of the bridge. The outer coil toward the bridge is active. So something must be awry with my wiring on the switch. I have double and triple checked it, and it sure looks like I put the wires back where they were when I pulled them off the other pickups. Of course on the Dimarzio it is black and white together rather than green and white. But otherwise, the positions should be the same. Hmm.

Also, in the second and fourth positions, I seem to be getting both lower coils on one, and both upper coils on the other. And I think it should be inner coils on one, outer on the other. So maybe that is messed up too. Hmm. Will have to do some study to see what I can fix before putting it all together.

Wiring stock:

IMG_5076_zpszrqmvbl7.jpg~original


Modded by me with Dimarzios

IMG_5080_zpsvvtwnudi.jpg~original


The rest of it is coming out really nicely. I really like the look of the new pick guard, especially with the zebra picked up. and I have the neck and frets cleaned up and feeling really good.

02a616391a92eeb6e0e1120b7b68c50d.jpg
 
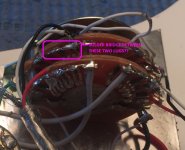
For the problem with the inner/outer coils at positions 2 & 4, I would just turn the neck pickup 180 degrees. The other issue with the one coil missing at position 3 sounds like there may be an unwanted connection/short between a couple of adjacent lugs on the outboard side of the switch.

EDIT: See photo attached--is that a solder bridge between the two adjacent lugs?

switch_solder_bridge.jpg
 
For the problem with the inner/outer coils at positions 2 & 4, I would just turn the neck pickup 180 degrees. The other issue with the one coil missing at position 3 sounds like there may be an unwanted connection/short between a couple of adjacent lugs on the outboard side of the switch.

Thanks DVM. That sounds like a possible solution on the coils. I had set them so both sets of wires came off toward the pots. Hmm. Maybe it will work the other way on the neck. It is a swimming pool route. For the other stuff, I may just redo that entire side. I have to re-do the hot wire for the bridge too, as I don't like the joint. The insulation is stripped too far back, and there is no slack.
 
That sounds like a possible solution on the coils. I had set them so both sets of wires came off toward the pots. Hmm. Maybe it will work the other way on the neck.
It'll work unless you have unusually short wires on the neck p/u. You want to keep the connections at the switch the same or run the risk of (a) wiring the two humbuckers out of phase, (b) wiring them so that they hum in combination, or (c) worst of all, both! The inside/outside coil thing is purely to get the added effect of varying physical separation between the active coils of each humbucker when in the 2 or 4 switch positions, so it has nothing to do with the wire connections. When the two inner coils are active, their closer proximity will give rise to greater magnetic filed-induced frequency cancellation than you'd get from the combination of the two outside coils, hence a noticeably different tone. Right now, I'd guess that the tone of those two positions is probably pretty much indistinguishable except for one being a bit more trebly than the other..

For the other stuff, I may just redo that entire side. I have to re-do the hot wire for the bridge too, as I don't like the joint. The insulation is stripped too far back, and there is no slack.
Do you have a solder sucker and/or de-soldering braid to clean up the joints after you de-solder the existing connections? Makes a big difference in keeping things neat.
 
I have a solder sucker that I ordered when I ordered the solder iron. I left it at work, and i plan on picking it up before I re-do this stuff.
 
One other update. I guess I may be ok on my wiring after all. I looked more closely at the specs and it lays out switching like this, in every place that I can find specs on switching.

Position 1. Full bridge pickup
Position 2. Two inside coils
Position 3. Full neck & bridge pickups
Position 4. Outer neck single coil
Position 5. Full neck pickup

SO, though my position two seems off due to the wrong coil being active in the neck, that is fixed by my swapping the pickup 180 around in the hole as DVM suggested. I put it in there with both sets of wires toward the pots, but maybe this Dimarzio is set up differently. In any case, there is room with the wire I have and in the hole just to switch it around. AND, looking at position 4, it appears I am not supposed to have a coil active on the bridge in that position. Looks like neck only. So I should be good! I guess I can swap that pup around and put it all back together after all.
 
Well, I thought it was working, testing with the screwdriver test. Put it all back together, strung it up, but no go on the bridge in any position. Despite it acting active when I tested. I must have something goofed up or loose on the power on that side, and knocked it putting it back together. So, good thing I left the extra string on the strings. Will try again either some night this week or more likely next weekend. The good news?? It looks awesome, and the neck pickup I bought sounds freaking great! It has a lot of articulate sound that is not all one blast of sound, but has some depth, and it will get the Weezery feedback I wanted. I think it will sound great for what I want. So that is cool!

So, the learning process continues. :)
431712d010754cc76c44a6681ef49809.jpg
 
That's what I like about the vintage-style tuners I put on my '51. Makes it easy to remove strings and string them back up quickly.

I had the same thing happen the first time I put my Lace pups in my '51. Got it back together and the bridge was dead unless the grounds were partially defeated. Turned out that the leads got pinched somehow in the bridge pup cavity itself. Just resetting it fixed the problem. Took a call to Lace to get it figured out, though.
 
Probably a twitchy solder joint on the bridge p/u connections. Could be either the hot or ground connections for that pickup.
 
So yay! Took it back apart, without ruining the strings on there, and cleaned up the solder in one area with the black and white wires from the bridge, where there was an extra big glop of solder, and re-did the red hot wire, as I did not like how that joint turned out anyway. Too much exposed wire with no insulation. So, corrected those things, and it all works! Awesome! I finally get to hear the Virtual Hot PAF I bought from Tone2theBone ages ago! And it sounds really good! I like the variation in the wiring set up this way too. Lots of different sounds. 2 and 4 are somewhat similar, but have their own vibe. One thing I might think about is seeing if a guy can take one of the tone pots and turn it into a blend pot as between the two pickups when they are being run together. I have never really messed with separate tone controls all that much.

Old nasty non functioning solder job
895b64831b25b7fc861f5a2cc1493556.jpg


New and improved. Now with sound!
554ef331b2c1b4a82e97104f2f9bbc64.jpg


All buttoned up. It seems to like its new friend, Rabid Rodent. ;)
a48d9e183b9551d801cb40320978e001.jpg
 
Congrats on getting the wiring sorted out, Steve - it can really make you sweat bullets when it doesn't work like it's supposed to!
 
Back
Top